After years of cobbling-together solar power systems I decided to try an off-the-shelf option. I've been considering this for awhile because I'd like to replace our gasoline-powered emergency generator with something less nasty but building home-scale power systems gets into energy levels that I'm not 100% comfortable being responsible for.
One of the reasons I've preferred the DIY route though is that I know for sure that I can integrate them into my own monitoring and automaton systems which are all Linux based, and many of the off-the-shelf units don't provide a way to do this external to the unit (or if they do it's via proprietary applications and nothing that supports Linux).
I had heard good things about the Bluetti units from several friends who told me that they can be monitored using an app that communicates over Bluetooth. This piqued my interest because I've had some luck reverse-engineering Bluetooth communications and thought this might be a way to get my hooks into these things. A few web searches quickly revealed that I'm not the only person who thought of this and it turns out most of the work has already been done.
So I purchased Bluetti's smallest (and cheapest) "generator" to experiment on with the idea that if I can get it to work with my systems (and other factors like quality, performance, etc.) we might buy a bigger, more modular system to replace the gas genny.
As it turns out it was very easy to monitor and control the Bluetti this way. Here's how I did it.
What you need:
* A Bluetti power station (I've only tested the EB3A)
* A computer setup to run Python
* An MQTT broker (I'll describe the one I used)
* A Home Assistant setup (only required if you want the dashboards I describe)
A Python package called bluetti-mqtt does all the hard stuff. I installed this on my Debian system using pip install bluetti_mqtt but if you're using something other than Linux you might need to refer to the documentation. Once this is installed, make sure Bluetooth is turned on, then turn-on your Bluetti and run:
bluetti-mqtt --scan
This should locate your Bluetti device and spit-out its address (something like 00:11:22:33:44:55). I had to run it two or three times before it found the unit. If you get this far the next step is to setup an MQTT broker (if you already have one, you can skip this next part).
MQTT is pretty cool, and has lots of uses. The one I used (mosquitto) is very easy to setup, especially if you're running on your own private network and don't need to worry about authentication, encryption etc. I installed this directly on my Home Assistant server but it can run anywhere on your network that is reachable by both the machine running bluetti-mqtt and Home Assistant (or whatever you're going to use to interact with the Bluetti via MQTT).
On Debian you can use sudo apt update && apt install mosquitto mosquitto-clients to install the broker and some utilities useful for troubleshooting. Once that's done you'll need to do a small bit of configuration before it will be usable by bluetti-mqtt and Home Assistant.
Edit /etc/mosquitto/conf.d/default.conf (it may not exist). Add the following and save the file:
allow_anonymous true
listener 1883
Then restart the broker:
sudo systemctl restart mosquitto
Now you should be able to connect Home Assistant to the broker. Click Settings -> Devices & Services -> Add Integration -> MQTT. Fill-out the form with the details for the computer you installed the broker on:
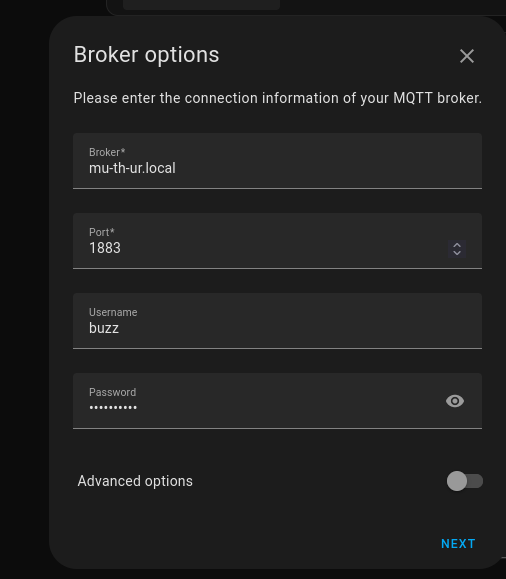
You should be able to leave username & password blank as we've enabled anonymous access.
Now you're ready to hook all the pieces together.
Back on the machine you installed bluetti-mqtt on, run the following command replacing <broker> with the name of the machine you installed mosquitto on and <address> with the address of your Bluetti.
bluetti-mqtt --broker <broker> <address>
If all goes well you should see some messages about connecting to the device and no errors. If you see errors, double-check the broker and Bluetti's addresses and make sure the computer you're running bluetti-mqtt on has Bluetooth enabled and is near the Bluetti device.
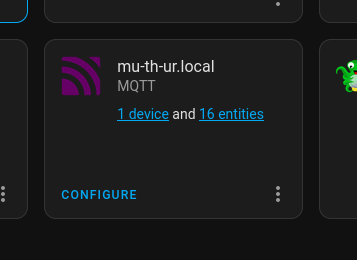
Now if you go to Settings in Home Assistant you should see an MQTT integration listing a device and several services:
Click on the device and you should see all sorts of controls and data sources from your Bluetti!
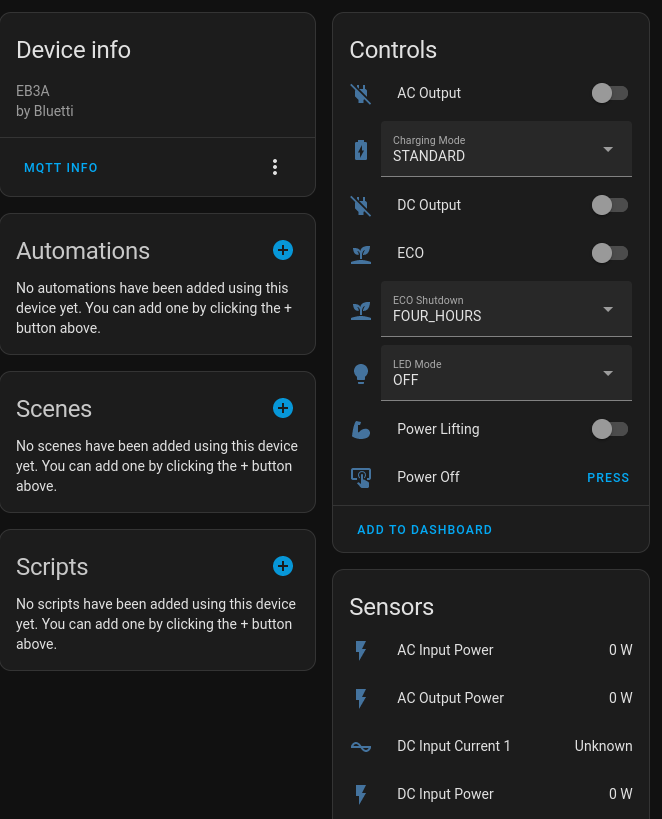
From here you can setup a dashboard in the typical fashion to create graphs, controls, etc. for the device and of course build it into automatons and all the other fun stuff that Home Assistant can do.

But what if I don't use Home Assistant?
There's a lot of software that can work with MQTT that might be useful to provide similar monitoring and control functionality to what's demonstrated here using Home Assistant. I don't have any personal experience with these things (most of my MQTT work has been centered around using programming tools to access MQTT brokers) but if I get a chance to try something else out I'll update this post.
I'm also planning to experiment with creating a JSFS-based accessory for the power station that will expose this data (and possibly controls) as part of the device's JSFS filesystem. I'm not sure yet if that will mean creating an interface between JSFS and MQTT, or if I'll just pull bluetti-mqtt apart and use the pieces that communicate and parse the Bluetooth data from the Bluetti, but in any event that work might provide additional ways to interface with these devices other than exactly how it's described here.
![]()